
A Life Less Lived
The only thing sadder than someone close to you dying is when you are still alive but treated as though you are dead.
Just a tad...
Work's over, the kitchen is clean, so I check the TV Guide to see if there's anything interesting on tonight. I find this:

Wait...what? She "endures" a decades-long slumber?
Oh the poor thing.
I've just returned from an interstate business trip and had to make arrangements today for next week's trip. I'll spend three days in one state, then travel to another for the next two. None of these are states in which I live. Two days of travel this week and I'm exhausted. Next week, I know, will be brutal.
So here, in no particular order, is what else is exhausting me:
Aren't you a tad tired of how I wrapped all that crap up with the tad bow? (I know I am.)
Wait...what? She "endures" a decades-long slumber?
Oh the poor thing.
I've just returned from an interstate business trip and had to make arrangements today for next week's trip. I'll spend three days in one state, then travel to another for the next two. None of these are states in which I live. Two days of travel this week and I'm exhausted. Next week, I know, will be brutal.
So here, in no particular order, is what else is exhausting me:
- My dad. He's recently spent time in the hospital - second (or is it the third?) time in the last 12 months. He started out skin and bones; now he's lost 20 pounds because hospital food is so crappy. He's being very well cared for but I'm painfully aware that he's not getting any younger. So I worry just a tad.
- My house. Literally half of it is still out of commission. With my work schedule cranking up, I haven't had the time nor the energy to tackle all the unfinished projects, so there they sit. This morning the flusher handle broke off the only toilet that's working. I overreacted just a tad.
- Work. I have been assigned two new projects at work. They are each enormous. I came in with three: have just closed one (but am dealing with some trailing tasks), my role in another is teensy-weensy, and the third takes a fair amount of my time and concentration. So the addition of two enormous and complicated projects is stressing me out a tad.
- People. I've recently been mentally gnawing on some family drama, and I've got one particular project stakeholder who's trying very, very hard to throw spike strips in front of me. Although I can navigate all this stuff, it is a tad exhausting.
- My grandson. His egg donor is a complete waste of atoms and molecules. We are drumming our fingers on the table waiting for the next court date. It's next week. I really wish I could be there (the schadenfreude is palpable when she's in the courtroom) but I have to be at a work function. In another state. So I'm a tad annoyed about that.
- My bed. It sucks. I need to buy a new one but I suffer from research-itis so although I've needed a new bed for at least three years now I haven't bought anything yet. Plus, the time to shop is not plentiful. The irony is that I have probably spent 1,242 times the money that a better bed would cost on massages to fix me when my current bed attacks. I'm a tad uncomfortable.
- My yard. I was just about to sign a contract with a dude to level my back yard, fix all the drainage issues, and pour a humongous, beautiful patio but then he went nuts on me and got all threatening and harassy. Now I'm having to delay that job until I can find the time to research and find a new contractor, plus I'm compelled to spend some of my valuable time warning the general public about him (Contractor's Licensing Board, Angie's List, etc.). Normally I would just let it go, but he went a tad bonkers.
- My fridge. I think it's trying to die. Last week it had two strokes and everything in the freezer melted. I let my frozen foods camp at my son's house for a few days, but after cleaning the back and rebooting the fridge a few times it appears to be working again. So I let the food come home. Only now I obsessively check several times a day to see if it's still working. And I'm continuing the fridge-research I started last week because I think the threat of getting a new one is making the old one try a tad harder.
- My clothes. I work from home, okay? I've been working from home for almost two decades. (I started when I was five.) Now when I travel for business I am expected to be ... professional. I'm not equipped for this. Now I need to shop. I loathe and despise shopping. Way more than a tad.
Aren't you a tad tired of how I wrapped all that crap up with the tad bow? (I know I am.)
The fat lady is preparing to sing
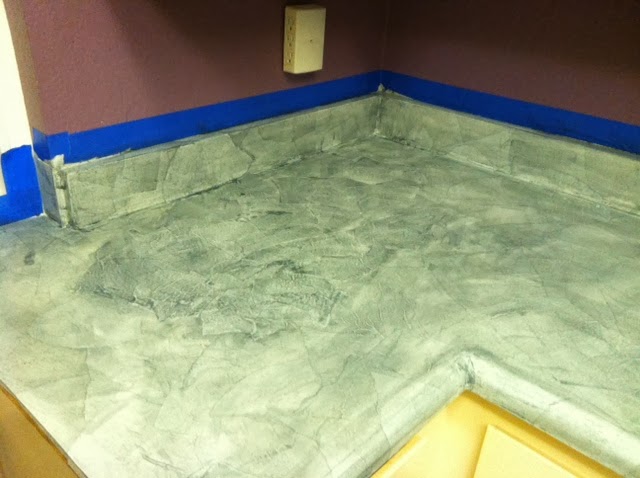
The 10th coat of acrylic went on yesterday. It dries to the touch in 15-20 minutes, can start being gently used in 12-18 hours, and after 3 months will be cured to a hard, clear finish.

I'm able to put my coffee maker and toaster on it each morning but am not planning to leaving them in place until several more days have passed. I don't want to run any risk of indentations or permanent scratches in the finish.
After being without a sink for a month now, it's really not difficult for us to work around this constraint. And I'm pretty sure we'll get a giant cardboard check and a Mylar balloon bouquet from the County for being The Most Frugal Water Customers on our block during this drought!
Taken in the daytime, unlike the other photos that required color adjustment,
this is an unretouched representation of the counters IRL.
I'm able to put my coffee maker and toaster on it each morning but am not planning to leaving them in place until several more days have passed. I don't want to run any risk of indentations or permanent scratches in the finish.
After being without a sink for a month now, it's really not difficult for us to work around this constraint. And I'm pretty sure we'll get a giant cardboard check and a Mylar balloon bouquet from the County for being The Most Frugal Water Customers on our block during this drought!
In the home stretch
After multiple mishaps requiring triage and more glue, this morning I finally got the counters into a state ready to receive the acrylic coating. This is the long-shot view after three coats of acrylic (sanding in between):

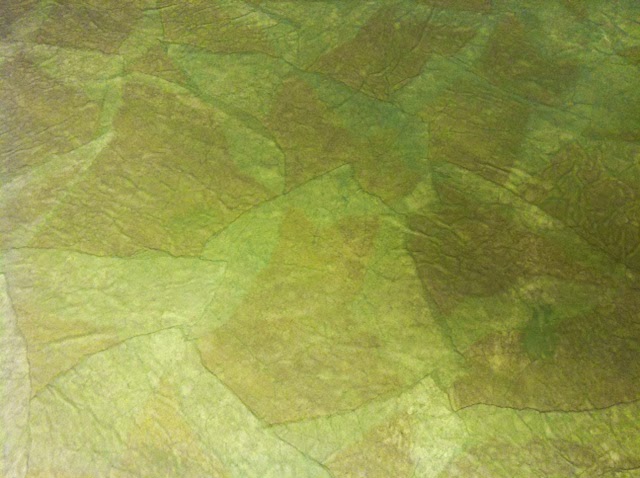
And here is what it looks like close up:

It pretty much looks exactly like the bathroom floor. I like how it's turning out and will keep applying acrylic tomorrow and the next day until I get at least six, maybe 10, coats on there. Only then will I feel like the finish is really protected and durable.
PS: Yes, this has taken longer than anticipated. The big joke around here now is that I can finish the project in an evening. I'm just not saying which evening.
And here is what it looks like close up:
It pretty much looks exactly like the bathroom floor. I like how it's turning out and will keep applying acrylic tomorrow and the next day until I get at least six, maybe 10, coats on there. Only then will I feel like the finish is really protected and durable.
PS: Yes, this has taken longer than anticipated. The big joke around here now is that I can finish the project in an evening. I'm just not saying which evening.
Update on counter remodeling project
I've been taking my time with this (as with everything else in life - heh), and had an evening off during a sister-visit, so I thought I'd make a new post on where this project is at this point.
On one section of the counter, we had some mishaps. The cat stepped on it while it was still wet and sticky, Steve tried to pick her up quickly, and she dug her claws in. That left a few tiny holes. So I went over that with some new paper. But when I opened the brew to paint it on, I stirred it with the paint brush and it loosened a bunch of stain that had settled at the bottom of the container. Like a dummy, I went ahead and painted it on. It was much darker. So I patched again, lather rinse repeat, and it just got worse and worse.


On one section of the counter, we had some mishaps. The cat stepped on it while it was still wet and sticky, Steve tried to pick her up quickly, and she dug her claws in. That left a few tiny holes. So I went over that with some new paper. But when I opened the brew to paint it on, I stirred it with the paint brush and it loosened a bunch of stain that had settled at the bottom of the container. Like a dummy, I went ahead and painted it on. It was much darker. So I patched again, lather rinse repeat, and it just got worse and worse.
When you mess up...
Last night I decided the whole section warranted a mulligan. I spent about 45 minutes ripping, crunching and smoothing out a new batch of paper, then about an hour (or less) applying the new paper right over the old mess. This time I was more careful not to slop, to catch all the drips, and to smoosh the bumps out with my finger while the paper was still wet and pliable.
...you just put on a new layer!
Looks much better, donut? This morning I painted on another layer of brew, and I'll continue to do that at intervals today until it matches the surrounding counter.
Admitted weirdness in this photo. Taking these at night, under the stupid fluorescent lights (which are a whole nuther future project), makes the cabinets look really yellow. They're not. They're actually a color that's like a little bit of coffee in a lot of milk. I used my El Cheapo photo editor to adjust the photo for more accurate representation, and now it looks like the whole kitchen hovers over nothingness. Don't walk in there! You'll fall to China!
Aaaanyway, before applying the Polycrylic, I want to take the counters down a few more shades. Not too dark, but darker than what you see here. I'll keep posting, natch.
I'm going to paper the whole world!
My current project is coming along just swimmingly. The sink is finished and was delivered back to me this afternoon.

It may look the same but it now has magical force field powers!
Since the sink is back already, I kicked the counter rehab into high gear tonight. Everything is moving very quickly and I thought I'd share the process here for those of you whohave no life are interested.
The first step is the most tedious. One must tear up forty gazillion pieces of paper, crunch each piece hard into a ball, then smooth it back out again. A lot of the how-to articles on the web are for projects that use brown paper, but because I want to end up with gray counters that look as much like marble as I can pull off, I'm using white butcher paper and a charcoal gray stain.
As I pull the balled up paper apart, I separate the pieces into two piles: one contains pieces with all ragged edges and the other contains the pieces that came from the side of the roll of paper so they have a nice, clean, straight edges on one side. These will be used for the straight edges of things. Voila! No cutting.

This picture not only shows the uber-exciting process described above, but also provides a good shot of my faux butcher block Formica counter. Say goodbye to it.
The bonus on this project is that I already had the supplies left over from the bathroom floor project, so it feels like it's free.

As you can see, I mix my brew in a container that I can cover and keep airtight overnight or when I take a break. At those times, I slip my foam brush into a zippy bag and that keeps it from drying and stiffening. The recipe for the brew is:
Take a piece of rumpled-then-smoothed-out paper. Paint one side of it with the brew. Flip it over, stick it where you want it, then paint the top side with the brew. THAT'S ALL YOU DO!!!
To prep for this job, all I did was clean the counters with Windex. You want to remove any oily spots and all crumbly bits, as you don't want those getting under your paper.
I was concerned at first that I may have to pump the brakes and run a coat of primer over the counters. My test spot looked like the butcher block madness was going to show through.
But after drying, it's perfect.


It may look the same but it now has magical force field powers!
Since the sink is back already, I kicked the counter rehab into high gear tonight. Everything is moving very quickly and I thought I'd share the process here for those of you who
The first step is the most tedious. One must tear up forty gazillion pieces of paper, crunch each piece hard into a ball, then smooth it back out again. A lot of the how-to articles on the web are for projects that use brown paper, but because I want to end up with gray counters that look as much like marble as I can pull off, I'm using white butcher paper and a charcoal gray stain.
As I pull the balled up paper apart, I separate the pieces into two piles: one contains pieces with all ragged edges and the other contains the pieces that came from the side of the roll of paper so they have a nice, clean, straight edges on one side. These will be used for the straight edges of things. Voila! No cutting.
This picture not only shows the uber-exciting process described above, but also provides a good shot of my faux butcher block Formica counter. Say goodbye to it.
The bonus on this project is that I already had the supplies left over from the bathroom floor project, so it feels like it's free.
Sorry about the horrible hue. Evening. Flash. Cell phone.
As you can see, I mix my brew in a container that I can cover and keep airtight overnight or when I take a break. At those times, I slip my foam brush into a zippy bag and that keeps it from drying and stiffening. The recipe for the brew is:
- 1 cup glue
- 1 cup water
- Approximately 2 tsp stain
Take a piece of rumpled-then-smoothed-out paper. Paint one side of it with the brew. Flip it over, stick it where you want it, then paint the top side with the brew. THAT'S ALL YOU DO!!!
To prep for this job, all I did was clean the counters with Windex. You want to remove any oily spots and all crumbly bits, as you don't want those getting under your paper.
I was concerned at first that I may have to pump the brakes and run a coat of primer over the counters. My test spot looked like the butcher block madness was going to show through.
Why the heck are my pictures so crappy!? IRL this is not at all green.
But after drying, it's perfect.
I am so excited by how this is turning out!
By my estimation, I should be finished applying the paper by tomorrow night. I'll make a run to Home Despot on Saturday morning and bring home some poly-acrylic. I plan to apply at least 6 and maybe up to 10 coats. That'll take a day or so to dry and 2-3 weeks to fully cure so we'll have to be gentle with the counters until then. The payoff will be [nearly] free, hard-as-nails, completely new and ossum counters.
My hope is that people who see it will ask what kind of stone it is. Only you and I, Interwebz, will know the truth.
DIY Alert!
Y'all may remember I bought, and Steve installed, this:
Squeee! I'm so excited about this project! Here's a before shot. I'll post afters after.


Well, I love it. The only bummer, though, is that to keep it looking new and gorgeous, one must massage it every 4-6 days with mineral oil. Otherwise it shows all manner of dried water schmutz and looks like this:
Hideous, right? BUUUTTT.....I have a son who is certified gunsmith and a Cerakote expert. He popped over here Monday night to help remove my sink and has hauled it off to Santa's workshop to perform his magic. He has the same sink and has followed the same process at his house (minus installing it before the Cerakote) and he's very happy with the results. I'm so pleased he's so good at what he does and all will be well in the end!

Hideous, right? BUUUTTT.....I have a son who is certified gunsmith and a Cerakote expert. He popped over here Monday night to help remove my sink and has hauled it off to Santa's workshop to perform his magic. He has the same sink and has followed the same process at his house (minus installing it before the Cerakote) and he's very happy with the results. I'm so pleased he's so good at what he does and all will be well in the end!
In the meantime, as is typical with houses, once the sink was removed I started thinking about finally doing something with the counter tops. I had talked myself into living peacefully with the fake wood grain Formica all these years not because I like it but because I've been loath to spend the money it takes to get what I really want: soapstone. BUUUTTT, now that we'll be making the sink perfect, and we won't want to have to remove it again once it's back in, I figured the time is right to make a move.
BUUUTTT, I still don't want to spend the money for soapstone, partly because it's a bit over-improving for the neighborhood and partly because I prefer not to have to live under a bridge when I'm 80. So I've decided to paper the counters. Like I did with the bathroom floor.*
Squeee! I'm so excited about this project! Here's a before shot. I'll post afters after.
*I just realized I never posted pix of the bathroom floor project. My bad. Here's a shot of the paper flooring I did to give you some idea of what I intend for the kitchen counters. The counters will be a bit lighter, though. More like Carrara marble (I hope).


Subscribe to:
Posts (Atom)